Living in a small apartment doesn’t mean you have to give up your gardening dreams. With a bit of creativity and a DIY spirit, you can build your own indoor garden tower that fits neatly into your space and grows fresh herbs and vegetables year-round. This guide will walk you through the concept, planning, and construction of a vertical hydroponic system tailored for compact living.
Understanding the Garden Tower Concept
An indoor garden tower is a vertical hydroponic system designed to grow multiple plants in a compact footprint. Unlike traditional soil-based gardening, hydroponics uses nutrient-rich water to deliver essential minerals directly to plant roots. This makes the system more efficient, cleaner, and ideal for indoor use. Vertical towers maximize vertical space, allowing you to grow upwards instead of outwards.
These towers are particularly suited for apartments because they require minimal floor space and can be adapted to various room layouts. Unlike commercial towers, which are often costly and come preassembled, a DIY tower can be built using simple, inexpensive materials while allowing you to tailor the design to your unique space and needs.
Additionally, vertical garden towers encourage resource efficiency. Since hydroponics uses less water than soil gardening and enables faster plant growth, your small-space garden becomes a practical, sustainable solution for year-round fresh produce.
Planning Your Build
Start by choosing a suitable location for your garden tower. Look for a spot near a window with plenty of indirect sunlight or an area where you can eventually add grow lights. Air circulation is important, so avoid cramped corners. Since you’ll be working with water, consider placing your tower on a surface that can handle occasional splashes or use a protective mat underneath.
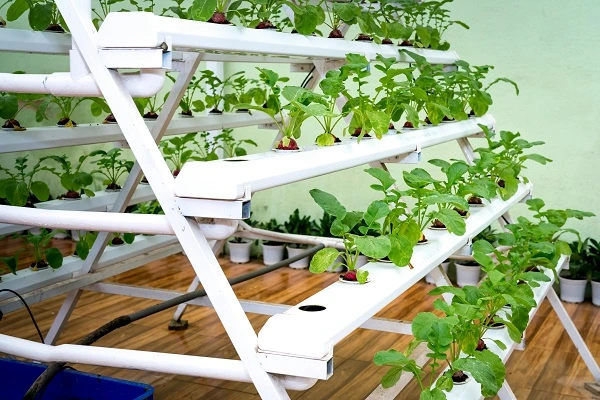
Next, assess the vertical space you have available. Measure the height from floor to ceiling and decide how tall your tower can be without becoming difficult to maintain. Think about the number of plants you want to grow. A basic tower with four to six tiers is usually enough for a small household’s fresh herbs and greens. Make sure you leave enough room between levels for plants to grow without becoming overcrowded.
Sketch your design before you begin. This will help you visualize the setup and plan your materials. Consider labeling each level with what you want to grow, how much water it will need, and the sunlight it will receive. Don’t forget to account for access—make sure you can reach all parts of the tower easily for maintenance and harvesting.
Think about workflow and how you’ll tend the tower. Will you stand or kneel? Can you turn or rotate the system? Planning these ergonomic factors now will make your gardening experience smoother in the long term.
Selecting Materials and Layout Style
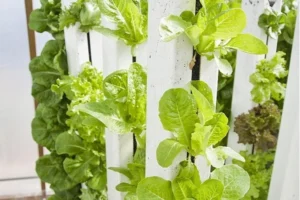
There are several DIY-friendly styles for building a garden tower. One common design uses PVC pipes as the central column, with holes cut into the sides for plant sites. Another approach involves stacking buckets or containers with planting holes and a central irrigation channel. You can also use a metal or plastic shelving unit and suspend net pots from each level, allowing water to drip from top to bottom.
If you’re on a budget, many of these materials can be repurposed from household items. Sturdy plastic containers, leftover piping, or even old storage shelves can be adapted into the structure of your tower. The most important part is creating a stable frame that supports your plants and allows water to flow through the system.
A key design consideration is drainage and water recirculation. For a simple passive system, gravity can do the work of circulating water. In more advanced setups, a small submersible pump can help move water from a base reservoir back to the top. Either way, aim for a closed-loop system that minimizes water waste and keeps the nutrients cycling through the tower.
When selecting net pots or growing containers, consider size, shape, and spacing. Net pots that are too close together can lead to overcrowding, while those too far apart may waste space. Choose a layout that balances productivity with airflow and accessibility.
Think about light access, too. If you’re relying on natural light, you may want to rotate the tower periodically or install reflective materials around it to bounce light into lower tiers. If you’re using artificial lighting, be sure to mount your lights in a way that covers the entire height of your tower evenly.
Noise and vibration from pumps can be a concern in small apartments. Choose low-noise equipment and add padding beneath the reservoir or tower base to reduce any sound transmission.
Building the Structure Step by Step
Once you’ve selected your layout and materials, you can begin construction. Start by assembling your frame. If you’re using a PVC pipe system, cut the pipe to your desired height and drill evenly spaced holes for net pots. Anchor the pipe securely in a base container that will also serve as your water reservoir.
If you’re stacking containers, cut holes in the sides of each bucket, then drill a central hole through the bottom of each to allow water to pass downward. Stack them securely, using spacers if necessary to create airflow and prevent tipping.
Next, prepare the water circulation method. For gravity-fed systems, place a funnel or perforated tray at the top to distribute water evenly. For pump-based systems, insert tubing from the reservoir up through the center of the tower, then allow water to trickle down through each layer.
Fit your net pots or planting cups into the holes you’ve made, ensuring they’re secure and won’t tip over when wet. Before planting, test the water flow through the system to check for leaks and ensure even distribution. Make adjustments as needed to get a consistent flow from top to bottom.
Add insulation around the reservoir or base if your indoor temperatures fluctuate significantly. This helps maintain consistent water temperature, which can improve plant health.
Secure electrical components safely. If using a pump or lighting system, keep all cords elevated and use a surge protector with a timer to automate your watering and lighting schedule. Always prioritize safety when water and electricity are involved.
Use zip ties, Velcro straps, or clips to tidy up tubing and electrical cables. A clean and organized setup is easier to maintain and reduces tripping hazards.
Preparing for Planting
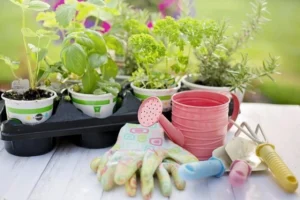
With your structure in place, it’s time to select your plants. Choose fast-growing, small-rooted varieties like lettuce, basil, cilantro, mint, arugula, or chives. These are perfect for indoor towers and thrive in hydroponic systems.
Start seeds in a growing medium such as rockwool or coconut coir plugs. Once the seedlings develop a few inches of root growth, transfer them into the net pots. Make sure the roots can reach the nutrient solution but are not completely submerged. This ensures they receive enough oxygen while still absorbing water and nutrients.
Space your plants so they don’t block each other’s light or airflow. Avoid overcrowding, especially in the lower tiers where light may be more limited.
Label your plants to keep track of varieties and growth rates. Monitor their progress and record notes to help improve future cycles.
You can also stagger planting times to ensure a continuous harvest. For example, plant new herbs every two weeks so you always have something ready to pick.
Maintain a planting schedule on a calendar or digital app to help organize your garden and know when to replace or rotate crops.
Running and Maintaining Your Tower
You can run your system either manually or with a small pump. In a manual setup, pour nutrient solution into the top of the tower once or twice a day, depending on plant needs and evaporation. For automated systems, set a timer to cycle the pump a few times daily to keep roots moist and fed.
Regularly check the water reservoir and top it off with fresh nutrient solution as needed. Replace the entire solution every one to two weeks to prevent buildup of salts and imbalances.
Keep an eye on your plants for signs of stress such as yellowing leaves, wilting, or slow growth. These could indicate nutrient issues or poor water flow. Clean the reservoir, tubing, and grow sites monthly to prevent algae and mineral buildup.
Monitor pH and EC (electrical conductivity) levels weekly. Keeping pH between 5.5 and 6.5 is ideal for most leafy greens. EC levels will help you gauge nutrient concentration.
Make sure your tower remains stable and doesn’t lean as plants grow heavier. If needed, anchor it to a wall or corner for extra security. Monitor indoor humidity and temperature—even small fluctuations can affect growth indoors.
Periodically rotate your tower or the pots (if possible) to ensure even light exposure. This prevents leggy or uneven growth.
Watch for root crowding over time. If roots become tangled or clog water channels, consider trimming them carefully or transplanting.
Check tubing and pump filters for blockages or wear. Keeping your equipment in good condition helps avoid unexpected failures.
Troubleshooting and Optimization
If you notice any leaks, immediately check your connections and seals. In gravity systems, a small drip may be normal, but pooling water is a red flag. Use waterproof tape or sealant if needed.
For pest management, keep an eye out for fungus gnats or aphids. While indoor towers are less susceptible to pests, they’re not immune. You can use neem oil or introduce beneficial insects like ladybugs to manage issues naturally.
To improve oxygenation, consider using an air stone in the reservoir. This can help prevent root rot and promote healthier plants.
If plant growth slows, reassess lighting, nutrient balance, and water quality. Minor tweaks often lead to big improvements in output.
As you become more comfortable with your setup, you might experiment with adding sensors or basic automation like water level alarms or Wi-Fi timers for your pump.
Track your yields and keep a journal of what works best. This will help fine-tune future towers and boost success rates over time.
Keep a small stash of extra net pots, tubing, and fittings so you can make repairs quickly without delaying your growing schedule.
The Bottom Line
By building your own indoor garden tower, you’re not just saving space—you’re creating a self-sustaining system that brings fresh food into your home all year long. Whether you’re growing herbs for cooking, leafy greens for salads, or just experimenting with hydroponics, this DIY project is a flexible and rewarding way to green your apartment life. Over time, you can expand, refine, and personalize your tower to match your needs and creativity.
Ready to grow upward? Your vertical garden journey starts with a single stack.